
Airflowをソースコードから起動する
風音屋アドバイザーの渡部徹太郎(@fetarodc) です。 このブログではAirflowをソースコードから起動する方法を説明します。 ソースコードから起動できると、デバッガを刺してデバッグしたり、一部書き換えて動作を検証したりと、色々便利です。
![]()
環境
- macOS BigSur(11.6.4)
- Python 3.9.7
- virtualenv 20.7.2
- Airflow 2.1.3
- Docker 20.10.12
Airflowのインストール
作業ディレクトリの準備
作業するディレクトリを作成し、環境変数 WORK_DIR に登録します。
export WORK_DIR=/Users/fetaro/airflow-lab #←自身の環境に合わせてください
mkdir ${WORK_DIR}
Airflowのソースコードclone
ソースコードをクローンする先のディレクトリを環境変数 SRC_DIR に登録します。
export SRC_DIR=${WORK_DIR}/airflow-src
GitHubからAirflowのソースコードをcloneします。今回は2.1.3のバージョンを動かしたいので、タグに2.1.3を指定します。
cd ${WORK_DIR}
git clone https://github.com/apache/airflow.git -b 2.1.3 ${SRC_DIR}
これでディレクトリ構造は以下のようになりました。
└${WORK_DIR}
 └airflow-src    ←SRC_DIR ソースコード
Python仮想環境のインストール
ここからはソースコードに付随する INSTALL のドキュメントに従って進めていきます。
GlobalのPythonの環境を汚さずにインストールするために、virtualenvを用いてPythonの仮想環境をつくり、アクティベートします。
cd ${WORK_DIR}
python3 -m venv venv-airflow
source venv-airflow/bin/activate
これでディレクトリ構造は以下のようになりました。
└${WORK_DIR}
 └airflow-src    ←SRC_DIR ソースコード
 └venv-airflow   ←仮想環境
Airflowの依存ライブラリのインストール
Airflowが依存しているPythonライブラリを、仮想環境内にインストールします。ソースコードのディレクトリに移動して、以下のコマンドを実行します。
cd ${SRC_DIR}
python -m pip install --upgrade pip
pip install .
インストールが完了すると、依存ライブラリと一緒にAirflow本体もインストールされてしまいます。 今回はクローンしたソースコードを実行したいため、紛らわしさの解消のためにインストールされたAirflowは消去します。
pip uninstall apache-airflow
Tips
インストール時に以下のエラーがでた場合は、pip自体が古いことが問題の可能性があります
Failed to build cryptography
ERROR: Could not build wheels for cryptography which use PEP 517 and cannot be installed directly
WARNING: You are using pip version 20.1.1; however, version 22.0.4 is available.
You should consider upgrading via the '/Users/fetaro/git/tmp/venv-airflow/bin/python3 -m pip install --upgrade pip' command.
私の環境では、以下のようにpip自体のアップグレードしたところこの問題は解消しました。
python -m pip install --upgrade pip
メインプログラムの起動確認
AIRFLOW_HOMEディレクトリや設定ファイルの準備
Airflowの起動確認をする前に、Airflowの設定ファイルやログが出力されるディレクトリを用意し、そのディレクトリを環境変数AIRFLOW_HOMEに設定します。
私は ${WORK_DIR}/airflow-home というディレクトリを作り、AIRFLOW_HOMEの環境変数をそのディレクトリにしました。
export AIRFLOW_HOME=${WORK_DIR}/airflow-home
mkdir ${AIRFLOW_HOME}
ディレクトリ構造は以下のようになりました。
└${WORK_DIR}
 └airflow-src  ←SRC_DIR ソースコード
 └venv-airflow ←仮想環境
 └airflow-home ←AIRFLOW_HOME
※ AIRFLOW_HOMEの環境変数を指定しない場合は ${HOME}/airflow が利用されます。
メインプログラムの起動確認
Airflowのプログラムの起点は${SRC_DIR}/airflow/__main__.pyです。
Airflowの各種操作はこの__main__.pyを実行します。
このプログラムを実行する際の注意点として、実行するディレクトリを ${SRC_DIR}/airflow に、Pythonのロードパスを ${SRC_DIR} に指定して実行する必要があります。
具体的には、以下のように実行します。
export PYTHONPATH=${SRC_DIR}
cd ${SRC_DIR}/airflow
python __main__.py airflow
以下のようにヘルプが出力されれば成功です。
usage: airflow [-h] GROUP_OR_COMMAND ...

positional arguments:
  GROUP_OR_COMMAND

    Groups:
      celery         Celery components
      config         View configuration
      connections    Manage connections
    ...
このコマンドを実行すると、AIRFLOW_HOMEの環境変数で示したディレクトリの中に、設定ファイルやログファイルが配置されます。
Tips
なお、pythonの引数に __main__.py を指定して実行する方法以外に、pythonコマンドのモジュール指定オプション -m を用いて、以下のように実行することもできます。
この場合、PYTHONPATHの環境変数の指定は不要です。
cd ${SRC_DIR}
python -m airflow
DBの準備
Airflowの状態を格納するDBをセットアップします。
デフォルトではsqliteという軽量なDBが用いられますが、今回はPostgreSQLをDBにします。 もし、デフォルトのままで良ければこの手順はスキップしてください。
PostgreSQLコンテナの起動
Dockerを用いてローカルホストの5432ポートに、ユーザ名postgres、パスワードなしのPostgreSQLを起動します。
docker run -d --name airflowdb -p 5432:5432 -e POSTGRES_HOST_AUTH_METHOD=trust postgres:11-alpine
データベースの作成
起動したPostgreSQLの中にAirflowという名前のデータベースを作ります。
docker exec -i -t airflowdb psql -h localhost -p 5432 -U postgres -c "CREATE DATABASE airflow"
Airflowの設定ファイルにDBの情報を設定
Airflowが先程作ったDBを利用できるようにしていきます。
Airflowの設定ファイルを変更します。具体的には${AIRFLOW_HOME}/airflow.cfg のsql_alchemy_connを変更します。
sql_alchemy_conn = postgresql://postgres:@localhost:5432/airflow
PostgreSQLへの接続に必要なライブラリのインストール
AirflowはデフォルトではPostgreSQLに接続しないため、PostgreSQLを利用するためには追加でライブラリのインストールが必要です。 以下のコマンドで必要なライブラリをインストールします。
cd ${SRC_DIR}
pip install .[postgres]
.[postgres]の部分は見慣れない形式かもしれませんが、これはpipの機能で追加のパッケージを指定する機能です(pipのマニュアル の7番目参照)。
このコマンドを打つと setup.py が起動し、その中に 定義 されているpostgres用の依存ライブラリがインストールされます。
DBの初期化
DB初期化コマンドで、Airflowが動作するために必要なテーブルなどをDB内に作成します。 以下のコマンドを実行します。
cd ${SRC_DIR}/airflow
python __main__.py db init
Tips
DB初期化時に以下のワーニングがでました。 これはORMであるSQL Alchemyからの警告で、https://sqlalche.me/e/14/qzyx に詳細が書いてありました。 日本語訳すると「2つ以上の関係がフラッシュ時に同じ列にデータを書き込むが、ORMにはこれらの関係を一緒に調整する手段がない場合を示しています。」となり、問題なさそうだったので、無視しました。
/Users/fetaro/airflow-lab/venv-airflow/lib/python3.7/site-packages/airflow/utils/db.py:641 SAWarning: relationship 'DagRun.serialized_dag' will copy column serialized_dag.dag_id to column dag_run.dag_id, which conflicts with relationship(s): 'DagRun.task_instances' (copies task_instance.dag_id to dag_run.dag_id), 'TaskInstance.dag_run' (copies task_instance.dag_id to dag_run.dag_id). If this is not the intention, consider if these relationships should be linked with back_populates, or if viewonly=True should be applied to one or more if they are read-only. For the less common case that foreign key constraints are partially overlapping, the orm.foreign() annotation can be used to isolate the columns that should be written towards. To silence this warning, add the parameter 'overlaps="dag_run,task_instances"' to the 'DagRun.serialized_dag' relationship. (Background on this error at: https://sqlalche.me/e/14/qzyx)
/Users/fetaro/airflow-lab/venv-airflow/lib/python3.7/site-packages/airflow/utils/db.py:641 SAWarning: relationship 'SerializedDagModel.dag_runs' will copy column serialized_dag.dag_id to column dag_run.dag_id, which conflicts with relationship(s): 'DagRun.task_instances' (copies task_instance.dag_id to dag_run.dag_id), 'TaskInstance.dag_run' (copies task_instance.dag_id to dag_run.dag_id). If this is not the intention, consider if these relationships should be linked with back_populates, or if viewonly=True should be applied to one or more if they are read-only. For the less common case that foreign key constraints are partially overlapping, the orm.foreign() annotation can be used to isolate the columns that should be written towards. To silence this warning, add the parameter 'overlaps="dag_run,task_instances"' to the 'SerializedDagModel.dag_runs' relationship. (Background on this error at: https://sqlalche.me/e/14/qzyx)
Airflow WebUIの起動
ここからはブラウザでアクセスできるAirflowのWebUIの準備と起動に入ります。
Airflowのadminユーザの作成
以下のコマンドでAirflowユーザを作ります。
cd ${SRC_DIR}/airflow
python __main__.py users create --username admin --firstname FIRST_NAME --lastname LAST_NAME  --role Admin --email admin@example.org
Webの画面で必要なアセットをコンパイルする
Airflowのフロントエンドは、webpackを用いてjavascriptのソースコードをまとめて圧縮して描画速度を高めています。 そのため、必要なアセットのコンパイルが必要です。
手元のMacOSにmd5sumコマンドがない場合は、以下のコマンドなどでインストールしておきましょう。
brew install md5sha1sum
以下のコマンドで、画面のアセットをコンパイルします。
cd ${SRC_DIR}
python setup.py compile_assets
Airflow Web Serverの起動
以下のコマンドで、AirflowのWebServerを起動します。
cd ${SRC_DIR}/airflow
python __main__.py webserver
以下のようにサーバのログが表示され続ける状態になれば成功です
rializedDagModel.dag_runs' relationship. (Background on this error at: https://sqlalche.me/e/14/qzyx)
  ____________       _____________
 ____    |__( )_________  __/__  /________      __
____  /| |_  /__  ___/_  /_ __  /_  __ \_ | /| / /
___  ___ |  / _  /   _  __/ _  / / /_/ /_ |/ |/ /
 _/_/  |_/_/  /_/    /_/    /_/  \____/____/|__/
[2022-04-24 12:15:28,398] {dagbag.py:496} INFO - Filling up the DagBag from /dev/null
Running the Gunicorn Server with:
Workers: 4 sync
Host: 0.0.0.0:8080
Timeout: 120
Logfiles: - -
Access Logformat:
=================================================================
[2022-04-24 12:15:33 +0900] [87663] [INFO] Starting gunicorn 20.1.0
[2022-04-24 12:15:33 +0900] [87663] [INFO] Listening at: http://0.0.0.0:8080 (87663)
[2022-04-24 12:15:33 +0900] [87663] [INFO] Using worker: sync
[2022-04-24 12:15:33 +0900] [87666] [INFO] Booting worker with pid: 87666
[2022-04-24 12:15:33 +0900] [87667] [INFO] Booting worker with pid: 87667
[2022-04-24 12:15:33 +0900] [87668] [INFO] Booting worker with pid: 87668
[2022-04-24 12:15:33 +0900] [87669] [INFO] Booting worker with pid: 87669
webブラウザにて http://localhost:8080 にアクセスし、adminユーザでログインすることで、以下の見慣れた画面になります。
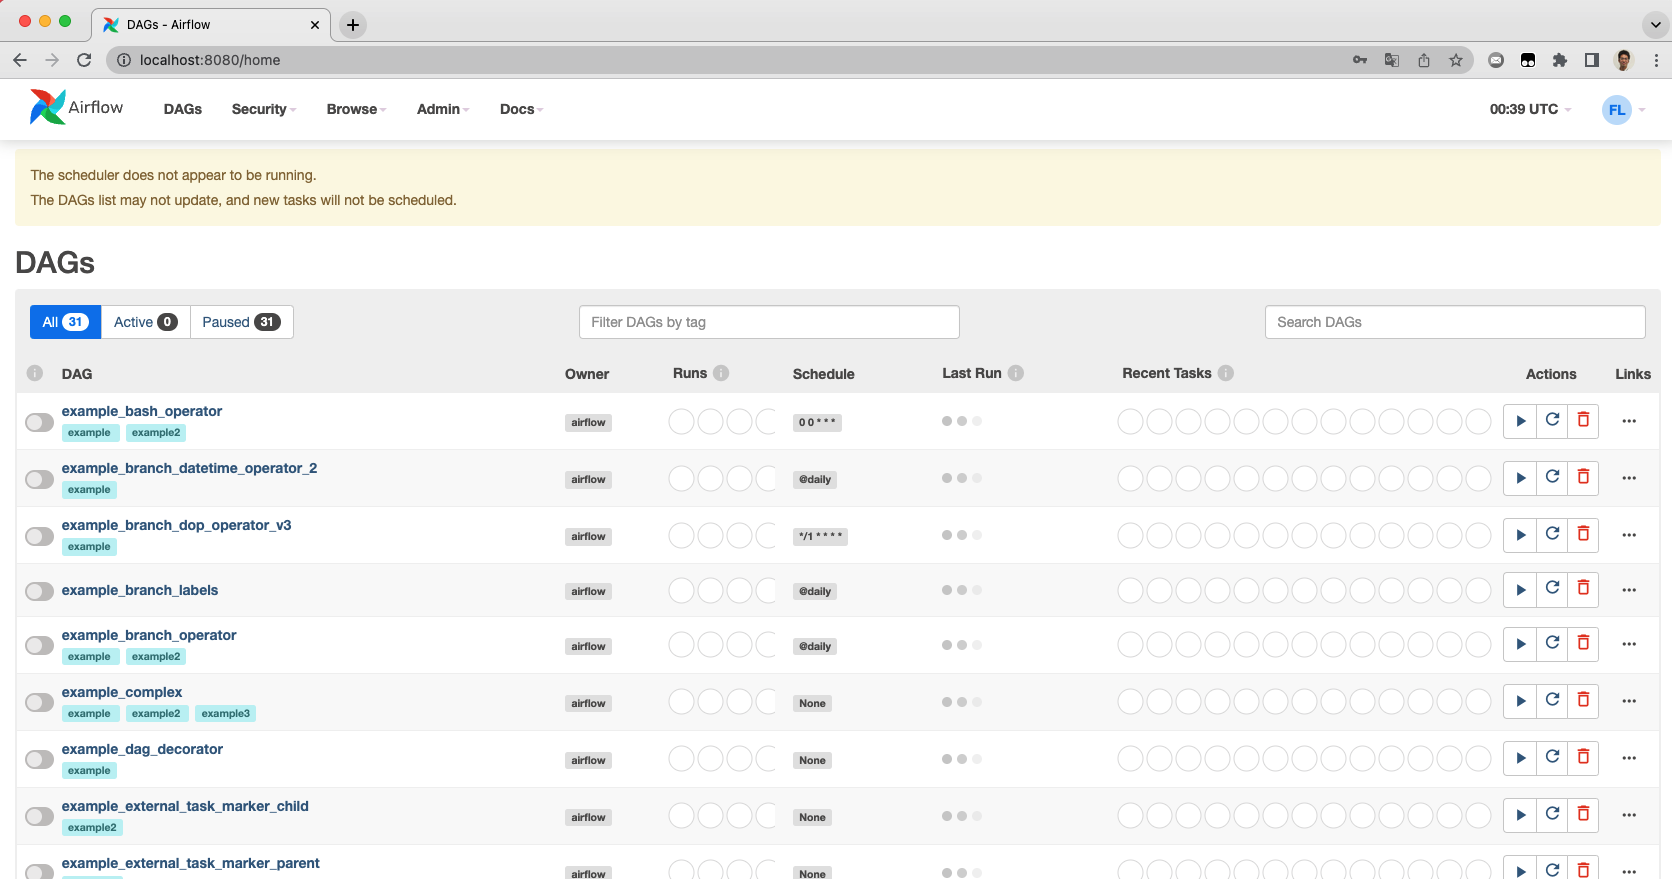
ただし、上部に「The scheduler does not appear to be running」と警告が出ていると思います。 これはスケジューラが起動していないためです。
次の手順でスケジューラを起動します。
Tips
起動するディレクトリを間違えたり、アセットのコンパイルをし忘れると、画面が崩れ、以下のようなstatic/ディレクトリが見つからないというエラーが表示されます。
Please make sure to build the frontend in static/ directory and restart the server
手順の実施漏れがないかを再度確認してください。
Airflow スケジューラの起動
Airflowスケジューラって何?と思う人もいるかも知れませんが、先程起動したWeb ServerはDBのデータを描画するためのものであり、DAGの実行などの機能はありません。 DAGの実行をするためにはAirflowスケジューラプロセスが起動している必要があります。
スケジューラの起動手順
もう一つターミナルを起動し、各種環境変数をセットし、Pythonの仮想環境をactivateします
export WORK_DIR=/Users/fetaro/airflow-lab #←自身の環境に合わせてください
export SRC_DIR=${WORK_DIR}/airflow-src
export AIRFLOW_HOME=${WORK_DIR}/airflow-home
export PYTHONPATH=${SRC_DIR}
source ${WORK_DIR}/venv-airflow/bin/activate
以下のコマンドでAirflow のスケジューラを起動します
cd ${SRC_DIR}/airflow
python __main__.py  scheduler
以下のように起動ログが表示され続ける状態になれば成功です
$ airflow scheduler
  ____________       _____________
 ____    |__( )_________  __/__  /________      __
____  /| |_  /__  ___/_  /_ __  /_  __ \_ | /| / /
___  ___ |  / _  /   _  __/ _  / / /_/ /_ |/ |/ /
 _/_/  |_/_/  /_/    /_/    /_/  \____/____/|__/
 * Serving Flask app "airflow.utils.serve_logs" (lazy loading)
 * Environment: production
   WARNING: This is a development server. Do not use it in a production deployment.
   Use a production WSGI server instead.
 * Debug mode: off
[2022-04-24 09:51:03,001] {_internal.py:113} INFO -  * Running on http://0.0.0.0:8793/ (Press CTRL+C to quit)
[2022-04-24 09:51:03,002] {scheduler_job.py:661} INFO - Starting the scheduler
[2022-04-24 09:51:03,003] {scheduler_job.py:666} INFO - Processing each file at most -1 times
[2022-04-24 09:51:03,009] {manager.py:254} INFO - Launched DagFileProcessorManager with pid: 83723
[2022-04-24 09:51:03,010] {scheduler_job.py:1197} INFO - Resetting orphaned tasks for active dag runs
[2022-04-24 09:51:03,017] {settings.py:51} INFO - Configured default timezone Timezone('UTC')
スケジューラが起動されたことにより、先程WebUIに表示されていた警告がなくなっていることを確認してください。
Tips
スケジューラの起動時に以下の警告が出ました。これはSQL Alchemyで特定の条件でキャッシュがきかずアプリケーションが遅くなる可能性があるといっています。 問題ないので、無視しました。
/Users/fetaro/airflow-lab/venv-airflow/lib/python3.7/site-packages/airflow/jobs/scheduler_job.py:1215 SAWarning: TypeDecorator UtcDateTime(timezone=True) will not produce a cache key because the ``cache_ok`` attribute is not set to True. This can have significant performance implications including some performance degradations in comparison to prior SQLAlchemy versions. Set this attribute to True if this type object's state is safe to use in a cache key, or False to disable this warning. (Background on this error at: https://sqlalche.me/e/14/cprf)
DAGの起動確認
試しに、一つのDAGを動かしてみましょう。
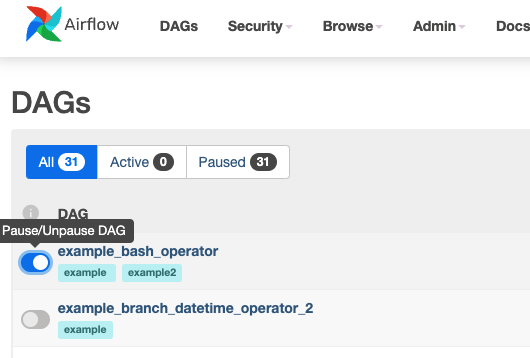
DAGsの画面から、「example_bash_operator」のチェックボックスをONにします。これで1分以内にサンプルのDAGが起動します。
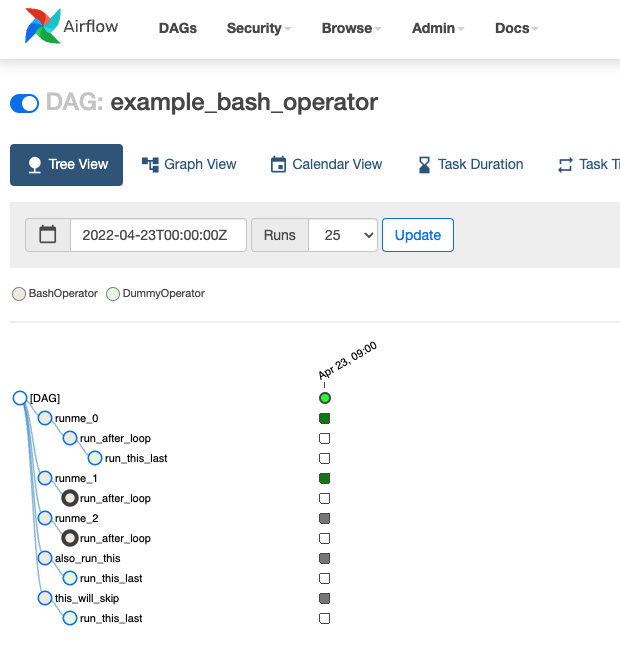
「example_bash_operator」をクリックすると動作している様子がわかります。
まとめ
今回の手順により、Airflowのソースコードをcloneしてきて、各種環境をセットアップし、WebUIプロセスとスケジューラプロセスを起動することができました。 あとは、デバッガを刺すなり、ソースコードを書き換えるなり、好きにいじっていただければと思います。